
Appearance
Import Layers
Import brings your own data into the map: a Shapefile, a KML, a spreadsheet of coordinates. You hand the wizard a ZIP, it opens the file and tells you what it found, you say what should happen to it, and a background job does the work while you carry on.
Where the wizard lives
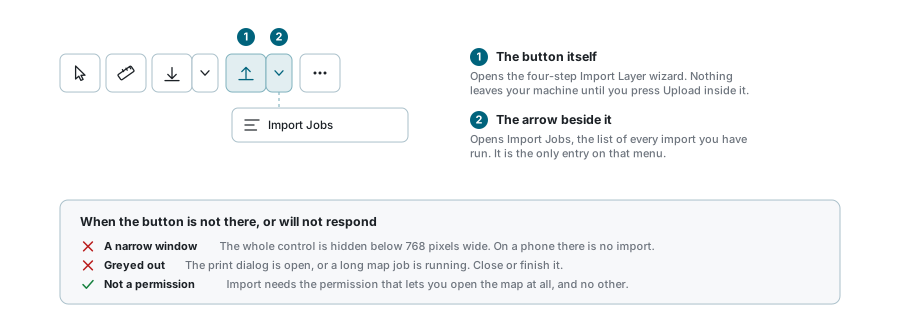
The Import button sits on the toolbar above the map. It has two halves: the button itself opens the wizard, and the small arrow beside it opens Import Jobs, which is the only entry on that menu.
Two things about the button are worth knowing, because they surprise people:
- It is hidden on a narrow window. Below 768 pixels wide the whole control is gone, so there is no importing from a phone.
- There is no separate import permission. If you can open the map, the wizard will open for you. Whether you may import into a particular layer is decided later, when the wizard asks the server which layers you may write to.
There is no import permission to ask for
Every part of the import service is guarded by the same permission that opens the application, so there is nothing here for an administrator to grant you. A missing button is the window width, not your account. What an administrator does control is which layers you may import into, and that shows up as a shorter target list in step 3.
What you can upload
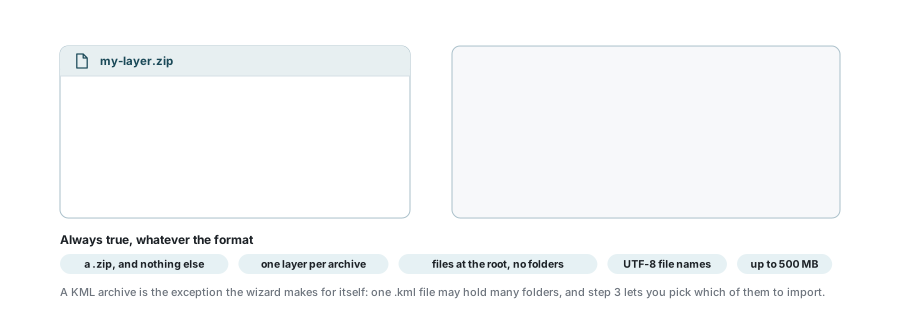
Whatever the format, the upload must be a ZIP archive, and the archive itself is checked before any file inside it is opened. Four rules apply every time:
- it is a
.zip, and at most 500 MB; - it holds one layer, not several;
- the files sit at the root of the archive. Zip the files, not the folder holding them - a single nested path is enough to have the whole thing refused;
- the file names are UTF-8.
A KML archive is the one exception the wizard makes for itself. One .kml file may describe many folders, and step 3 then lets you tick which of them to import, each becoming its own layer.
The formats it reads
| Format | What must be in the ZIP |
|---|---|
| ESRI Shapefile | .shp + .shx + .dbf + .prj, all four sharing one name |
| MapInfo TAB | .tab + .dat + .map + .id + .ind |
| MapInfo MID/MIF | .mif + .mid |
| KML | one .kml |
| Geodatabase table | one .gdbtable |
| GeoJSON | .geojson or .json |
| GeoPackage | .gpkg |
| GML | .gml |
| CSV | one .csv |
| Spreadsheet | one .xlsx, .xls or .ods |
A whole geodatabase will not go in
The wizard's own on-screen list offers "ESRI Geodatabase (.gdb)". A .gdb is a folder, and folders are refused, so that entry cannot succeed as written. What does work is a single .gdbtable file taken out of the geodatabase. For anything larger, export to Shapefile or GeoPackage first.
If an archive somehow holds two of these formats, the first one in the list above wins, and everything else in the archive is ignored.
The four steps
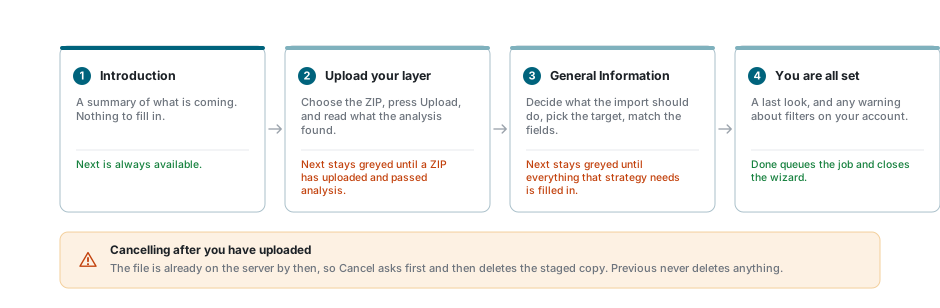
The wizard is four steps, and Next is greyed until the step it is on is satisfied. Previous always works and never undoes anything.
Cancel is different. Once you have pressed Upload the file is already on the server, so cancelling asks you to confirm and then deletes that staged copy. Closing the dialog with the X does the same thing.
Step 2 - upload and read the analysis
Choose the ZIP, then press Upload. Nothing leaves your machine until you do. The file is uploaded, the archive is checked against the rules above, and then it is opened and read.
What comes back is a summary you should actually read:
- the format it was recognised as;
- the feature type - point, line, polygon or none at all;
- the feature count;
- the fields, with their types, under Show detected fields;
- any warnings.
If the archive holds more than one layer, the summary shows the total instead, and a per-layer breakdown is listed underneath, because the count and the field list differ from layer to layer. An archive with more than 100 layers is refused outright.
A refusal tells you which rule you broke
The red panel under the upload area is not a generic failure. It names the violated rule - the offending nested paths, the missing sidecar file, the second .shp - so read it before changing anything. Re-uploading also clears out the copy of the previous attempt on the server.
Step 3 - what the import should do
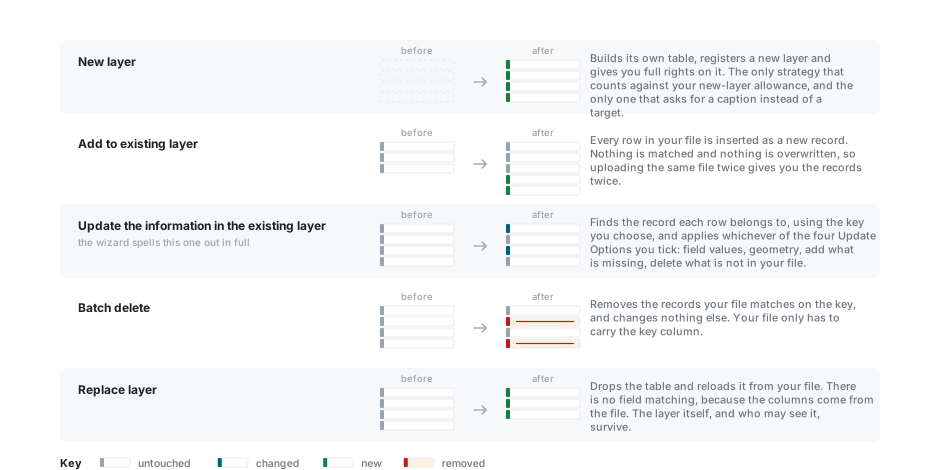
Upload Type is the choice everything else in this step depends on.
| Upload Type | What it does to the target |
|---|---|
| New layer | Builds its own table, registers a new layer, and gives you full rights on it. Asks for a caption instead of a target, and is the only one that uses up part of your new-layer allowance. |
| Add to existing layer | Inserts every row of your file as a new record. Nothing is matched and nothing is overwritten, so uploading the same file twice gives you the records twice. |
| Update the information in the existing layer | Finds the record each row belongs to using the key you choose, then applies the Update Options you tick. |
| Batch delete | Deletes the records your file matches on the key, and changes nothing else. Your file only has to carry the key column. |
| Replace layer | Drops the table and reloads it from your file. There is no field matching, because the columns now come from the file. The layer itself, and who may see it, survive. |
For anything but New layer you must pick an Import to Layer target. The list only offers layers you may write to, and only those whose geometry suits the file you uploaded, so a layer you can see on the map may still not be on the list.
The Update Options
Update the information in the existing layer is really four independent operations, and at least one has to be ticked:
| Option | What it does |
|---|---|
| Update mapped field values | Copies the mapped columns onto every record the key matches. |
| Update geometry | Replaces the shape of every record the key matches. |
| Add features missing in target | Inserts the rows whose key matches nothing. |
| Delete features not in source | Deletes the records whose key appears nowhere in your file. |
Read the last one twice
Delete features not in source removes records because they are absent from your file. Upload a partial extract with it ticked and everything you left out is deleted. It is limited to the records your account is allowed to see, which is a safety net, not a plan.
Coordinates and projections
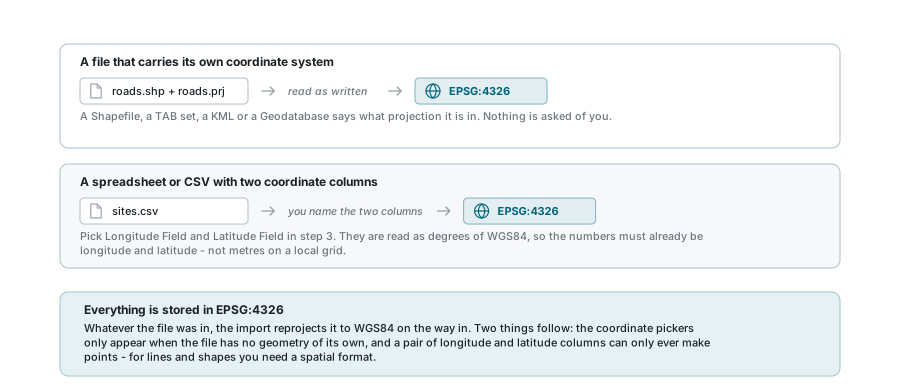
A spatial file says what projection it is in, and the import reprojects it to EPSG:4326 on the way in. You are asked nothing.
A spreadsheet or CSV usually says nothing, so the wizard shows a Longitude Field and a Latitude Field picker. Those two columns are read as degrees of WGS84, which means the numbers must already be longitude and latitude - eastings and northings on a local grid will land somewhere absurd, without complaint.
The pickers only appear when they are needed. They are hidden when the file already resolved a geometry of its own, when the target layer holds lines or shapes rather than points, and for Replace layer and Batch delete, which have no use for them.
Two columns can only make points
A longitude and a latitude produce a point. There is no arrangement of spreadsheet columns that produces a line or a polygon - for those you need a spatial format.
Matching the fields
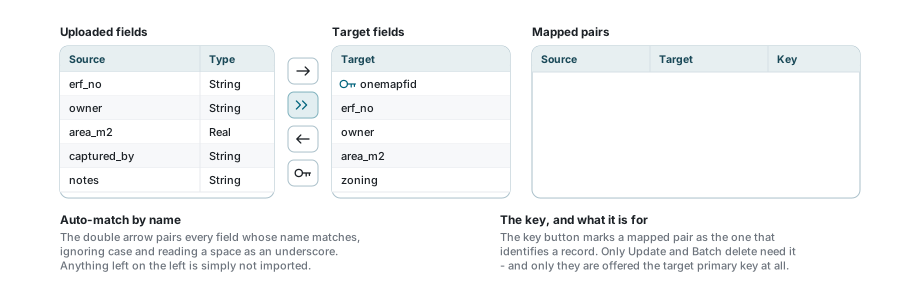
The Field Mapping panel is three lists. Uploaded fields on the left, the target layer's fields in the middle, mapped pairs on the right. Click one on each side and the right arrow pairs them; the double arrow auto-matches by name, ignoring case and reading a space as an underscore.
The part people get wrong is what happens to the rest. A field you do not pair is not imported. Nothing warns you, because leaving columns behind is a perfectly ordinary thing to want. Check the left-hand list before you move on.
The middle list only offers fields you are allowed to write to, and it hides the layer's own primary key unless the strategy is Update or Batch delete. Appending records generates their keys in the database, so mapping onto the key there could only do harm.
The mapper is not shown at all for Replace layer.
Choosing the key - Synchronize on
Update and Batch delete have to find the existing record each of your rows belongs to. That is what the key is for.
- Map the column that identifies a record, on both sides.
- Select that mapped pair and press the key button.
- Choose it under Synchronize on.
If one column identifies a record on its own, pick that one. If it takes a combination - a plot number that only repeats per township, say - mark each of those pairs as a key and select them all. Records are matched only where every chosen column is equal.
Two rows with the same key stop the import
If your file has two rows carrying the same key, there is no single value to update the target record with. The import stops and tells you which keys are duplicated rather than picking one at random.
The target layer's own primary key is offered here, and is usually the safest thing to match on - but only if your file came out of this system in the first place.
Step 4 - confirm and start
The last step is a review, and it is where a warning about your account appears.
If your account is limited - by a filter built into the layer, by an area you are restricted to, or by attribute values your account is fixed to - the wizard says so plainly and lists what applies. The point is not decorative: an update, a replace or a delete can only touch the records you are allowed to see. Everything outside those limits is left exactly as it was. If your limits currently match nothing at all, it says that too, because the import will then change nothing.
Press Done and the job is queued. The wizard closes and Import Jobs opens on its own.
Where the result appears
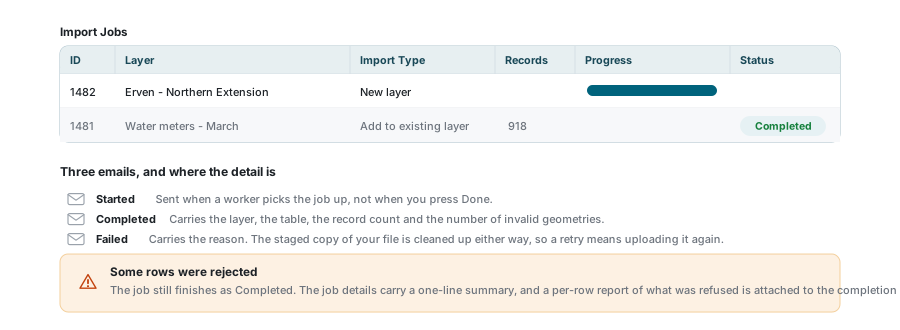
The import runs in the background. You can close the wizard, work on the map, or sign out - the job carries on regardless.
Open Import Jobs from the arrow beside the Import button to watch it. Each import is one row: the layer, the type, the record count, a progress bar and a status. See Background Jobs for what the statuses mean, how to cancel one, and what the details panel holds.
Three emails come out of an import: one when a worker starts it, one when it completes, carrying the layer, the table, the record count and how many geometries were invalid, and one if it fails, carrying the reason.
A new layer is not on your map yet
A successful New layer import creates the layer and gives you full rights on it, but nothing puts it in front of you. Add it from the Layer Repository, then save your workspace.
When only some rows fail
An import that hits bad rows does not throw the whole file away. It reloads, this time skipping the rows it cannot read, and finishes as Completed with the rest.
You are told, in two places. The job's details carry a one-line summary naming the first thing that went wrong, and a full per-row report is attached to the completion email. That attachment is the only copy - nothing serves it from the application - so keep the email if the report matters.
The copy of your file on the server is deleted once the job ends, whether it succeeded or failed. A failed import is rolled back rather than resumed, so a retry means uploading the file again. Where one archive produced several layers, the copy is held until the last of them has finished.
How many new layers you may create
Your site may cap how many layers each subscription may create. Many sites set no cap, and then nothing in this section applies to you. Only New layer imports count; updates, appends, replaces and batch deletes do not.
This is a running total of the imports you own, not a monthly allowance. Imports that were cancelled or that failed have never counted, and deleting an import from Import Jobs releases the slot it was holding. Going over the cap is refused when you press Done, not earlier, so a large multi-layer selection that does not fit is rejected whole rather than partly imported.
Two layers may not share a caption, either. The check is case-insensitive, and it looks at layers that already exist and at imports of your own still in flight.
If something looks wrong
| What you see | What it means |
|---|---|
| No Import button on the toolbar | Your window is under 768 pixels wide. It is not a permission. |
| The Import button is grey | The print dialog is open, or a long map job is running. Finish or close it. |
| "The ZIP must not contain folders or nested paths" | You zipped the folder instead of the files. Open the folder, select the files, and zip those. |
| "Shapefile is missing required sidecar file(s)" | A Shapefile is four files. Without the .prj nothing knows what projection it is in. |
| "Shapefile ZIP must contain exactly one .shp" | One archive, one layer. Split them and import them one at a time. |
| "No spatial layers found in the ZIP" | The archive uploaded, but nothing readable was inside it. Check the files sit at the root and that no sidecar is missing. |
| "The ZIP could not be analysed" | The archive is damaged, password-protected, or nested inside a subfolder. Open it locally to confirm it opens cleanly. |
| "File is too large" | Over 500 MB. Split the data, or drop the columns you do not need. |
| Next is greyed on step 2 | The upload has not finished, or it finished and was refused. There is a message either way. |
| The target layer list is empty | Nothing you may write to has geometry matching your file. A layer you can see is not necessarily one you may import into. |
| No Longitude and Latitude pickers | Your file already has geometry of its own, or the target holds lines or shapes rather than points. |
| Fields arrived empty after the import | They were never paired in the field mapper. An unpaired field is not imported. |
| The key is not offered under Synchronize on | No mapped pair has been marked with the key button yet. |
| "A layer with this name already exists" | Captions are unique, ignoring case. Your own queued imports count as taken names. |
| The import was refused when you pressed Done | You are at your new-layer cap. Delete an import you no longer need from Import Jobs, or ask about a larger subscription. |
| Completed, but the record count is short | Some rows were rejected. The details panel says so in one line, and the full report is attached to the completion email. |
| An update ran and changed nothing | Either no Update Option was ticked, or the key matched nothing. Check the key on both sides before the options. |
| Fewer records changed than you expected | Your account is limited to a filter, an area or a set of values. An import only touches what you can see. |
See also
- Background Jobs - statuses, cancelling, and the job details panel
- Layer Repository - putting a freshly imported layer on your map
- Export Layers - the same thing in the other direction
- Data Table - checking what actually arrived
- Map Tools - the rest of the toolbar