
Appearance
Georeferenced Images
Georeferencing is how you tell the map where a picture belongs. You have a scanned survey diagram, an old township plan or a sketch; you point at three or more spots on that picture, say where each of those spots is on the ground, and from then on the picture can be drawn on the map at the right place, the right size and the right angle.
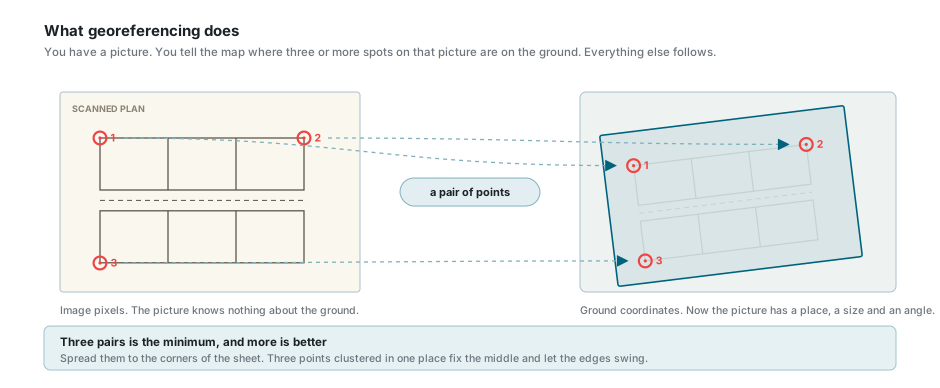
The picture itself is an attachment on a feature, and georeferencing never changes it. What you make is a separate record alongside it: your points, the fit worked out from them, and a straightened copy of the picture that a background job renders for you.
What you need first
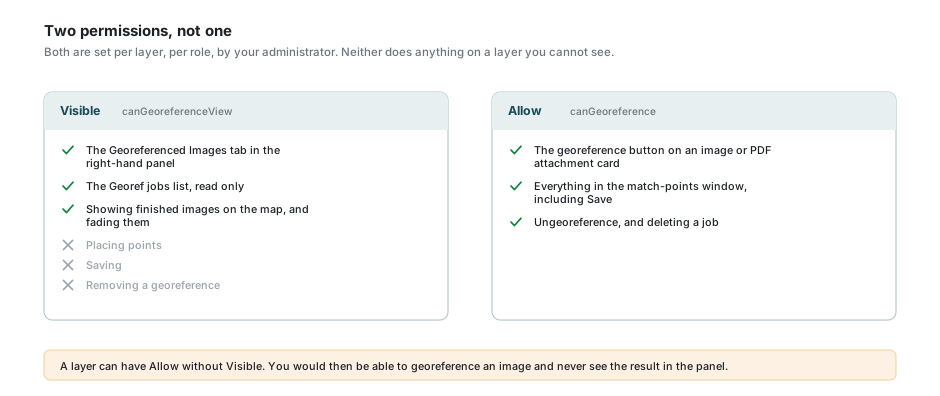
Georeferencing is controlled by two separate permissions, both set per layer and per role by your administrator, and neither of them does anything on a layer you cannot already see.
- Visible lets you look. It puts the Georeferenced Images tab in the right-hand panel, lets you open the jobs list, and lets you draw finished images on the map and fade them. The tab appears as soon as one layer gives you this.
- Allow lets you work. It puts the georeference button on an attachment card, opens the match-points window, and is what Save and Ungeoreference need.
Nothing at all on this page?
If you have neither permission on any layer, none of this is on your screen: no tab, no buttons, no jobs list. That is the normal state for most accounts, and your administrator decides who gets it.
Getting an image in
Georeferencing starts from an attachment. Open a feature's Attachments, find the scan, and press the georeference button on its card.
Only images and PDFs can be georeferenced, and the attachment has to belong to a layer. A PDF is turned into a picture on the server first: every page is rendered and stacked into one tall image, at 300 dots per inch or less on a very large sheet. That happens while the window is already open, so you will see Rasterising PDF for a few seconds on a big drawing. If it has not finished after three minutes the spinner is replaced by a message rather than spinning forever.
The small coloured icon on the card tells you where that attachment stands, and it refreshes itself every few seconds for about three minutes after you save:
| Colour | What it means |
|---|---|
| Grey | Not georeferenced yet. |
| Orange | Queued, or being rendered right now. |
| Green | Done. The image is available to put on the map. |
| Red | Failed, or saved with fewer than three points. |
The match-points window
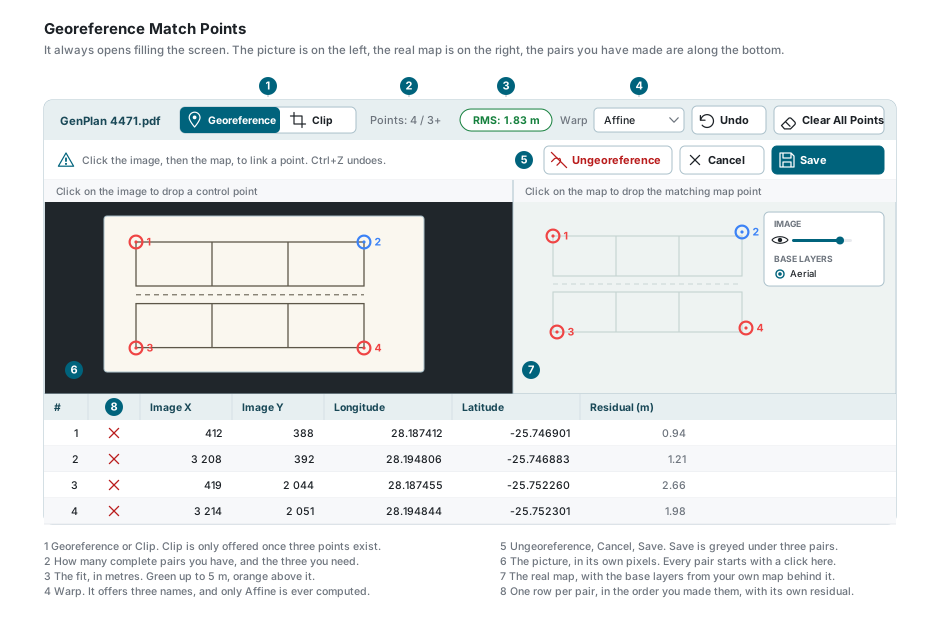
The window always opens filling the screen. You can drag it, resize it from any edge, and drag the dividers between the three panels; the divider between the maps and the table is remembered for next time. On a phone the two maps stack and the points table is not shown at all.
The right-hand map is a real map. It carries the base layers from your own map, so you can georeference against aerial photography if that is what you have, and its small floating box lets you fade the image and the base map against each other while you work.
Placing control points
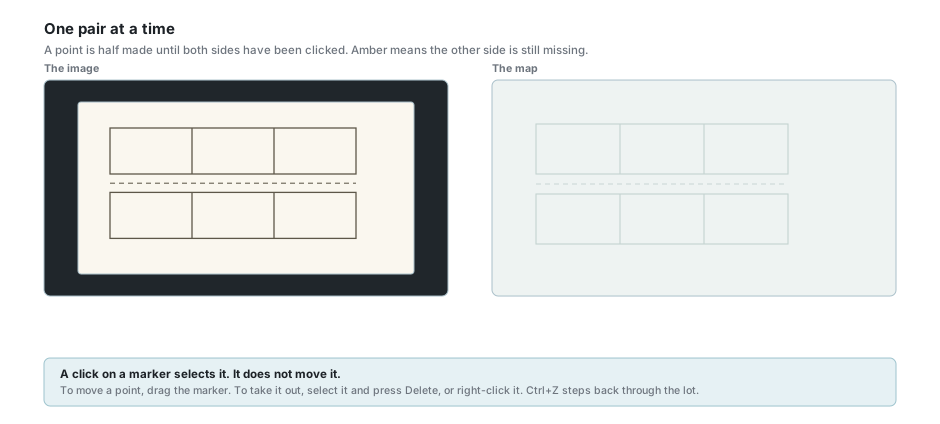
A control point is a pair: one position on the picture, one position on the ground. You make one by clicking each side in turn.
- Click a spot you can recognise on the picture. A ring appears in amber, meaning one side only.
- Click the same spot on the map. Both rings turn red and the pair takes the next number.
- Do it again, at least twice more, spread as far apart on the sheet as you can manage.
You can start on either side. Clicking the map first and the picture second makes the same pair.
| Action | What it does |
|---|---|
| Click a marker | Selects that pair and highlights it on both sides. Clicking it again deselects it. |
| Drag a marker | Moves that side of the pair. A click never moves a point. |
| Right-click a marker | Removes the pair. |
| Delete | Removes the selected pair. |
| Esc | Cancels a half-placed point. Right-clicking empty space does the same. |
| Ctrl + drag | Draws a box and selects every marker inside it, on that side only. |
| Arrow keys | Nudges the selected markers by one pixel, or ten with Shift held. |
| Ctrl + Z | Steps back through your last fifty changes. |
Clear All Points empties the lot in one go, without asking first. Ctrl + Z brings them all back.
Spread them out
Three points bunched into one corner fix the middle of the sheet and let the far edges swing. Four points, one near each corner, are worth more than eight points along one edge.
Reading the fit
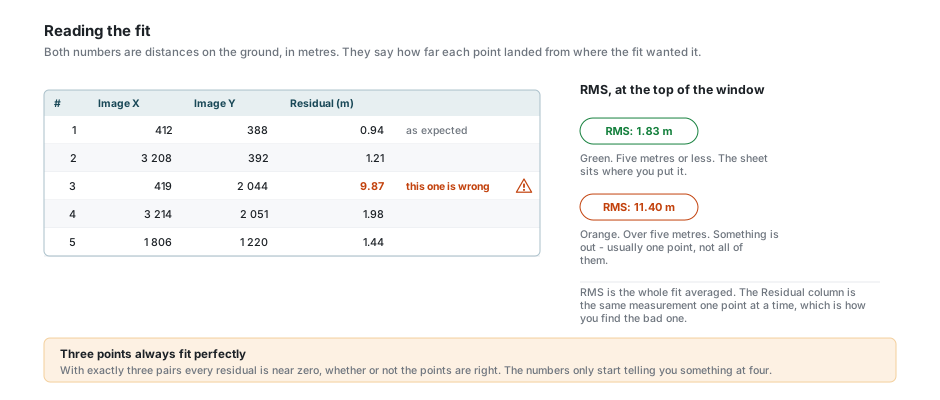
Two numbers tell you how well the fit worked, and both are metres on the ground.
- RMS, at the top of the window, is the whole fit averaged into one number. It is green up to five metres and orange above that.
- Residual, one per row in the table, is the same measurement for a single point: how far that point ended up from where the fit wanted it. The same five-metre line turns it orange.
A high RMS is almost never every point being slightly wrong. It is usually one point being badly wrong, so read down the Residual column, find the big number, and check that pair. Either the spot on the picture or the spot on the map is not where you thought.
Three points always fit perfectly
With exactly three pairs the fit passes through all three, so every residual is near zero whether or not the points are right. The numbers only begin to mean anything at four points. If the image lands in the wrong place while the residuals all read zero, that is the reason.
The Warp list offers three names and only ever does one
Affine, Projective and Helmert are all in the dropdown, but the fit is worked out the same way whichever you pick, both in this window and on the server: a least-squares affine through your points. Changing it changes nothing about the result. It does re-queue the job, so the picture is rendered again for no gain.
Clipping the sheet
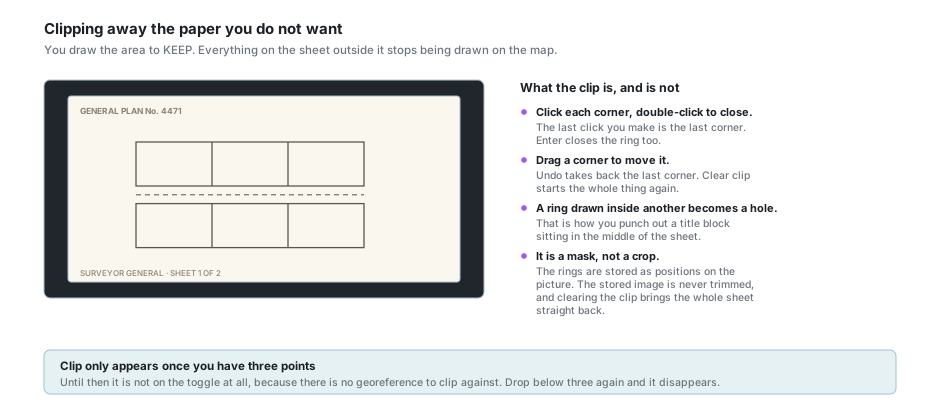
A scanned sheet is mostly not map. There is a border, a title block, a legend, and a lot of blank paper, and all of it lands on your map along with the drawing. Clip trims it away.
Switch the toggle at the top of the window from Georeference to Clip, then click your way around the part of the sheet you want to keep. Everything outside it stops being drawn.
- Double-click, or press Enter, to close the ring. Esc throws away the ring you are drawing without touching the ones you have finished.
- Drag a corner to move it. Alt + click a corner to delete it.
- A ring drawn inside another becomes a hole in it, which is how you cut out a title block sitting in the middle of the drawing.
- Undo takes back the last corner. Clear clip starts the whole thing again.
Clip only appears once you have three points
Until then it is not on the toggle at all, because there is no georeference to clip against. Drop back below three points and it disappears again.
The clip is a mask, not a crop. The rings are stored as positions on the picture, the stored image is never trimmed, and clearing the clip brings the whole sheet straight back.
Saving, and the job that runs
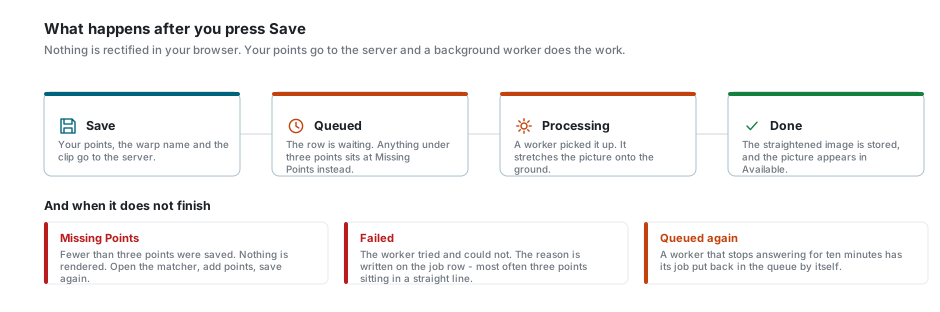
Save sends your points, the warp name and the clip to the server and closes the window. It is greyed out until you have three complete pairs and no half-placed point waiting.
Nothing is rendered in your browser. The record is queued, and a background worker picks it up within a few seconds, stretches the original picture onto the ground and stores a straightened, north-up copy of it. Very large scans are reduced on the way through, so a huge sheet comes back a little softer than the original.
| Status | What it means |
|---|---|
| Queued | Waiting for a worker. Normally a few seconds. |
| Processing | Being rendered now. It cannot be deleted while it is in this state. |
| Done | Finished. The image is now in the Available list. |
| Missing Points | Saved with one or two points. Nothing is rendered. Add points and save again. |
| Failed | The worker tried and could not. The reason is written on the job row, and three points in a straight line is the most common one. |
A worker that stops answering for ten minutes has its job put back into the queue automatically, so a job that seems stuck on Processing usually recovers on its own.
Reopening the same attachment brings your points back, and pressing Save again re-queues the job. The new rendering replaces the old one in place, so anything already showing on the map updates rather than doubling up. Changing only the clip, or only the warp name, also re-queues it.
Closing the window with unsaved work asks first, and while you have unsaved work the window's own X and the Esc key are switched off, so Cancel is the way out.
Watching a job
The Georef jobs button appears both in the Attachments dialog and at the top of the Georeferenced Images panel. It opens a list of your georeference records in every state, not only the finished ones, and it refreshes itself every four seconds while it is open.
The list shows the status, the layer, the record, the caption, the warp name, how many points were saved, when it last changed, and the error message for anything that failed. A status dropdown, a date range and a search box narrow it down. Site administrators get a second All tab covering everybody, with a filter by user.
Delete all clears every job in whatever the current tab covers, which on Yours means your own jobs on layers you may edit. Deleting is not instant: the row is marked Pending deletion and the worker removes the stored image before the record itself goes.
Showing an image on the map
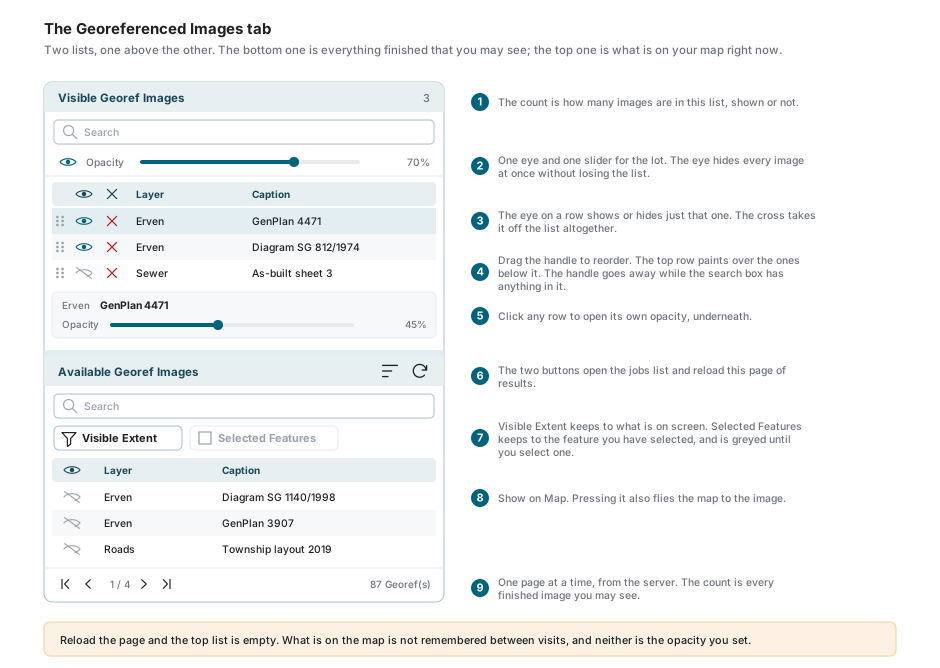
Open the Georeferenced Images tab in the right-hand panel. Like the other panels there, it can be pulled out into a window of its own.
Available Georef Images
The lower list is one page at a time of every finished georeferenced image you are allowed to see. Queued, failed and half-finished ones are not here; they are in the jobs list.
Two toggles narrow it:
| Toggle | What it does |
|---|---|
| Visible Extent | Keeps to images that fall inside what is on screen, and re-reads the list as you pan. |
| Selected Features | Keeps to the feature you have selected. Greyed out until you select something. |
Press the eye on a row to put that image on the map. The map also flies to it, so you can see straight away whether it landed where you expected.
Visible Georef Images
The upper list is what is currently on your map. It is ordered: the top row paints over the ones below it, and the drag handle reorders them. The handle goes away while there is anything in the search box, because reordering a filtered list would not mean anything.
- The eye and the slider at the top of the panel act on all of them at once. The eye hides every image without emptying the list.
- The eye on a row shows or hides just that one. The cross takes it off the list altogether.
- Clicking any row opens a small pane underneath it with that image's own opacity, separate from the panel-wide one.
- Hovering a row outlines that image on the map, which is how you tell two similar scans apart.
A georeferenced image is drawn above everything else
Overlays sit above every data layer on the map, not among them, so a fully opaque scan hides your data completely. That is what the opacity sliders are for. Note also that nothing here is remembered: reload the page and the top list is empty again, at full opacity.
Removing a georeference
Ungeoreference is on the attachment card and inside the match-points window. It deletes the straightened image and clears the control points and the clipping, and it cannot be undone. The attachment itself is untouched, so you can start again from the same scan.
If something looks wrong
| What you see | What it means |
|---|---|
| No Georeferenced Images tab | No layer gives you the Visible georeference permission. |
| No georeference button on the card | You have Visible but not Allow, or the attachment is not an image or a PDF. |
| "Rasterising PDF" for a long time | A large multi-page drawing takes time. After three minutes it gives up and says so. |
| The image panel is blank with a warning | The scan could not be read or the PDF could not be prepared. Try a different file. |
| Save is greyed out | Fewer than three complete pairs, or one point is still half placed. Finish it or press Esc. |
| Clip is not on the toggle | You have fewer than three points. It appears at three. |
| RMS is orange | Read down the Residual column, find the one big number, and check that pair. |
| Every residual is zero but the image is wrong | You have exactly three points. Add a fourth and the numbers start telling you something. |
| Changing Warp makes no difference | Correct. Only the affine fit is ever computed, whichever name is chosen. |
| The card icon stays orange | The job is queued behind others. Open Georef jobs to see where it is. |
| The card icon is red | Failed, or saved with fewer than three points. The jobs list carries the reason. |
| A job says "Pending deletion" | The worker removes the stored image before the record goes. It clears itself. |
| A job will not delete | It is being rendered. Wait for it to finish. |
| The retry button on a job row does nothing | Reopen the matcher from the attachment and press Save. That re-queues the job. |
| The image is on the map but covers everything | Overlays are drawn above all data layers. Turn the opacity down, or hide it with the eye. |
| Hiding an image does not remove it | The eye hides; the cross takes it off the list. |
| The panel is empty after a reload | What is on the map is not remembered between visits. Add the images again. |
See also
- Attachments - where the scan lives, and where georeferencing starts
- Data Table - opening a record's attachments
- Feature Selection & Popup - picking the feature the scan belongs to
- Layer Control - the layers a georeferenced image is drawn over